37 Directory Listings
Your website supports a Business Directory Listing feature in addition to regular listings. It lets businesses publish profiles with contact info, location, branding, social links, business hours, and tier-based upgrades.
This guide explains how to:
1. Enable directory listings
2. Configure directory tiers
3. Create paid tier packages
4. Let business owners submit listings
5. Moderate and verify listings
6. Manage upgrades and expirations
How It Works: The Big Picture
1. You enable Directory in WaaS settings
2. You create a Directory Index Page (public directory browse page)
3. You configure Directory Tier Configs (Basic, Premium, VIP capabilities)
4. You create store products for Premium/VIP packages
5. Business owners use Dashboard -> My Business Listings
6. Listings are submitted for review
7. You approve/publish and optionally verify listings
8. Owners can later upgrade tiers or featured status
Part 1: Enable Directory Feature
Step 1: Open WaaS Settings
1. Go to Site Admin (usually `/admin/`)
2. Click Settings
3. Open WaaS Settings
Step 2: Turn On Directory
1. Check Enable business directory (`enable_directory`)
2. Optional but recommended:
- Allow self-registration (`directory_allow_self_registration`)
- Require approval (`directory_require_approval`)
3. Click Save
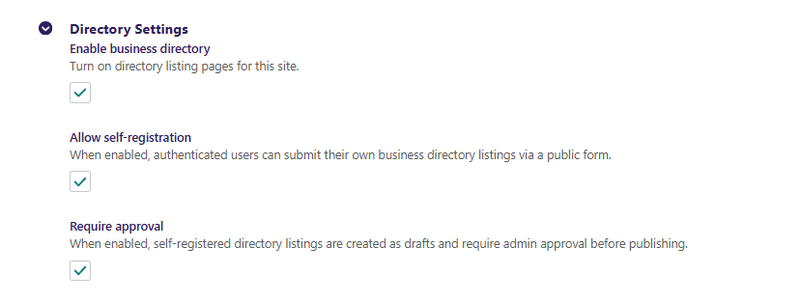
What These Settings Mean
- `enable_directory`: master on/off switch
- `directory_allow_self_registration`: allows authenticated users to submit listings from dashboard
- `directory_require_approval`: keeps new submissions pending until approved
Part 2: Create Public Directory Pages
Step 1: Create Directory Index Page
1. Go to Site Admin -> Pages
2. Choose where the directory should live
3. Click Add child page
4. Select Directory Index Page
5. Fill in title and slug (example slug: `directory`)
6. Save and Publish
Step 2: Confirm Page Is Live
1. Visit your directory URL
2. You should see an empty state until listings are active
Note: Directory listings can be created under Directory Index Page (or in some setups under Listing Index Page), but using Directory Index Page keeps it clean for site owners.
Part 3: Configure Directory Tiers
Tiers control which listing fields and capabilities are available.
Step 1: Create Tier Configs
1. Go to Site Admin -> Snippets -> Directory Tier Configurations
2. Create one config per tier for your site:
- `basic`
- `premium`
- `vip`
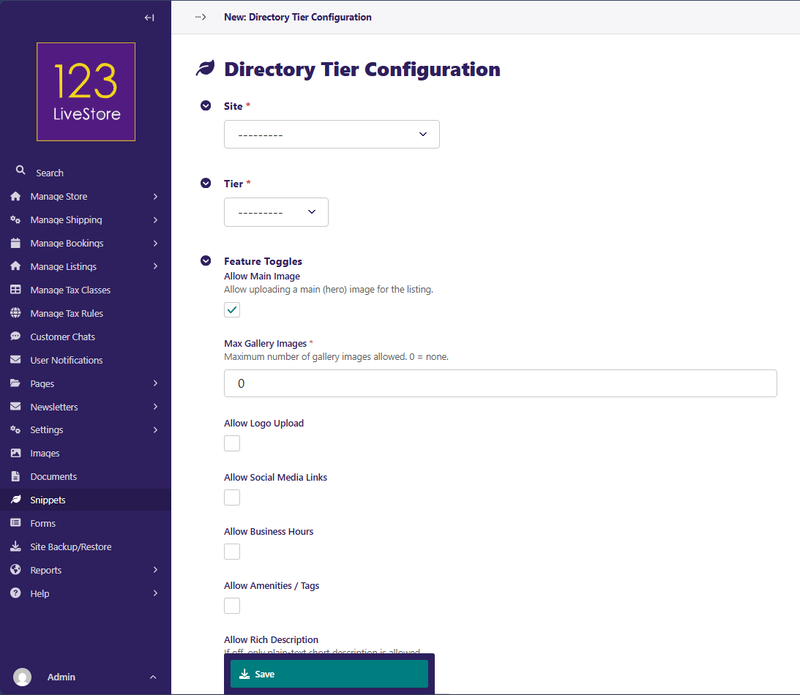
Step 2: Configure Feature Toggles Per Tier
Typical toggles include:
- `allow_main_image`
- `allow_logo`
- `allow_social_links`
- `allow_business_hours`
- `allow_amenities`
- `allow_rich_description`
- `allow_booking_link`
- `allow_featured_upgrade`
- `allow_whatsapp`
- `allow_external_link`
- `max_gallery_images`
- `tier_upgrade_window_days`
Example Tier Strategy
| Feature | Basic | Premium | VIP |
|---|---|---|---|
| Main Image | Yes | Yes | Yes |
| Logo | No | Yes | Yes |
| Social links | No | Yes | Yes |
| Business hours | No | Yes | Yes |
| Rich description | No | Yes | Yes |
| Gallery images | 0 | 5 | 15 |
| WhatsApp / external / booking links | No | No | Yes |
| Featured upgrade eligibility | No | No | Yes |
Part 4: Create Tier Package Products
Premium and VIP creation/upgrades rely on store products.
Step 1: Create Product Page
1. Go to Product Index Page
2. Add Product Page
3. Set:
- Item Type = Intangible
- Title e.g. "Directory Premium Tier", "Directory VIP Tier"
Step 2: Mark as Directory Tier Package
In Directory Tier Package Settings:
1. Check Is Directory Tier Package (`is_directory_tier_package`)
2. Set Directory Tier (`directory_tier`) to `premium` or `vip`
3. Set Directory Tier Duration (Days) (`directory_tier_duration_days`)
4. Add product variants with price
5. Publish
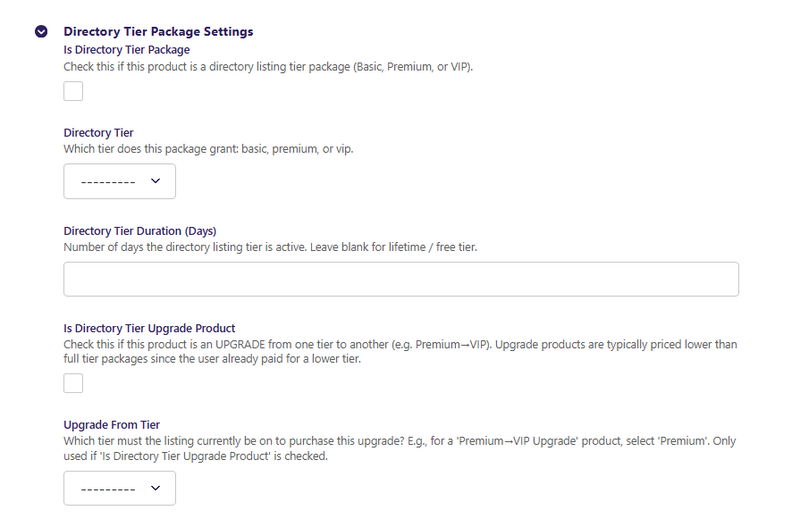
Optional: Create Upgrade Products
For differential pricing (example Premium -> VIP cheaper than full VIP):
1. Create another Product Page
2. Check Is Directory Tier Package
3. Check Is Directory Tier Upgrade Product (`is_directory_tier_upgrade`)
4. Set Upgrade From Tier (`directory_upgrade_from_tier`) to `premium`
5. Set `directory_tier` to `vip`
6. Set upgrade price variant and publish
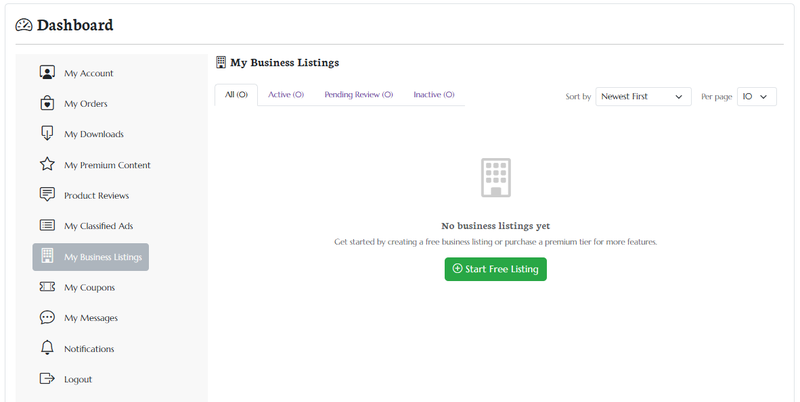
Part 5: Business Owner Submission Flow
Dashboard Entry Point
Business owners use Dashboard -> My Business Listings (`/dashboard/my-business/`).
What They See
1. Tier comparison cards (Basic/Premium/VIP)
2. Buttons based on package state:
- Basic: Add Basic (Free) Listing
- Premium/VIP: Buy or Create if unused package exists
3. Existing listing cards with status, tier badge, and available actions
Creating a Listing
1. Owner clicks create button for selected tier
2. Fills form fields (tier-gated)
3. Submits via Submit for Review
4. Listing is usually created as Pending Review
Tier-Gated Form Behaviour
Depending on tier config, form may include:
- Main image / logo / gallery uploads
- Rich description
- Social links
- WhatsApp
- External link + button text
- Booking link URL
- Classifier/category terms
Part 6: Approval, Verification, and Claiming
Approving Listings
1. Review pending listing from admin
2. Check content quality and policy compliance
3. Publish/activate approved listings
Pending Report
Use Reports -> Pending Directory Listings for moderation queue.
Claimed vs Verified
Directory supports two separate trust signals:
- Claimed: listing owner has claimed or created listing
- Verified: admin has validated legitimacy
Recommended process:
1. Keep claimed auto-state for registered creator listings
2. Set verified only after checks (contact, brand consistency, legitimacy)
Part 7: Upgrades, Expiry, and Featured
Tier Expiry
Paid tiers can have `tier_expires_at` based on package duration.
When expired:
1. Listing may lose active paid-tier benefits
2. Owner needs a new package or upgrade action
Upgrade Paths
From listing cards, owners can:
1. Apply an unused package (if available)
2. Buy Premium/VIP package
3. Use Premium -> VIP upgrade product (if configured)
Featured Upgrades
If enabled by tier config and featured products are configured, listing owners can purchase featured boosts.
Part 8: Best Practices
Setup
- Keep directory toggle and self-registration settings intentional
- Configure all 3 tier configs before launch
- Publish at least one Premium and one VIP product
Moderation
- Review pending submissions daily
- Verify high-value listings before marking verified
- Archive low-quality/spam entries quickly
Tier Design
- Keep Basic useful but limited
- Make Premium clearly more valuable
- Reserve strongest lead-generation features for VIP
Conversion
- Use clear tier pricing and feature differences
- Offer upgrade products (especially Premium -> VIP)
- Keep dashboard CTAs simple and always available
Part 9: Troubleshooting
Directory page returns disabled/404 behavior
1. Confirm `enable_directory` is checked in WaaS settings
2. Confirm page is published
Owners cannot self-register listings
1. Confirm `directory_allow_self_registration` is enabled
2. Confirm user is authenticated
Listing stuck in pending
1. Confirm moderation flow is completed
2. Publish listing from admin
3. Check `directory_require_approval` behavior for your policy
Buy/Upgrade buttons not appearing
1. Confirm tier products are published in active locale
2. Confirm product has `is_directory_tier_package` checked
3. Confirm correct `directory_tier` and variants
Tier expiry date not set
1. Confirm product has `directory_tier_duration_days`
2. Confirm listing is linked to valid paid tier order
Cannot edit active listing from dashboard
Current owner dashboard editing is designed around pending/inactive editing flow. If active listing editing is needed, use moderation/admin workflow or request a custom policy update.